


- Step 1: Get organised with everything you’ll need
- Step 2: Create a custom Javascript variable within Google Tag Manager
- Step 3: Connect your Google Analytics tag with the Google Tag Manager Custom Dimension
- Step 4: Create a new Custom Dimension in Google Analytics
- Step 5: Access the report in Google Analytics and run a test
- Final thoughts
An opportunity has been unveiled from a discussion on Twitter. Before I get stuck into the tracking method, I want to make clear that this wasn’t something I discovered personally.
There are several talented individuals in the SEO community who contributed to the final product that you will come across in this post.
I want to also highlight: this loophole could go away tomorrow. This doesn’t appear to be a feature that Google was aware of either. So don’t invest too much time in the setup, and I’ll try be efficient with this post too.
Shoutout to Chris Schimkat who helped me process the discussions on Twitter (which I’ll reference individually). You should totally click this link to the agency he works for: Reprise Digital.
Let’s get straight into the steps to see Featured Snippet clicks via Chrome. Note: this only has the *possibility* to work when the Chrome browser is in use (desktop and mobile). Learn more about Featured Snippet highlights.
This approach will also only work on mobile if AMP is not used. AMP URLs don’t have the #:~:text= appended to the URL, so even if Chrome is in use, it won’t trigger within Google Analytics (side note: challenge, anyone?)
The 5 steps to tracking Featured Snippet clicks via Chrome:
1. Get organised with everything you’ll need
2. Create a custom Javascript variable within Google Tag Manager
3. Connect your Google Analytics tag with the Google Tag Manager Custom Dimension
4. Create a new Custom Dimension in Google Analytics
5. Access the report in Google Analytics and run a test
Step 1: Get organised with everything you’ll need
To start tracking Featured Snippet clicks for your website via Chrome, you’ll need the following: a website (doesn’t necessarily need to rank highly to create a test), an installed Google Tag Manager container, and Google Analytics setup as a tag within that container.
If you don’t have much experience with GTM, you should be able to get that setup in place fairly easily with some good ole’ Google searching. It’s going to become a bit more tricky (hence why I needed some help), so you’ll need to read each step carefully.
Step 2: Create a custom Javascript variable within Google Tag Manager
Credit: I believe it was Alec Bertram who first discovered this was possible (in response to a tweet by Chris Johnson who had the idea). This was then workshopped more by Eoghan Henn who first showed a working example, and who was kind enough to offer me assistance for this post (thanks Eoghan!)
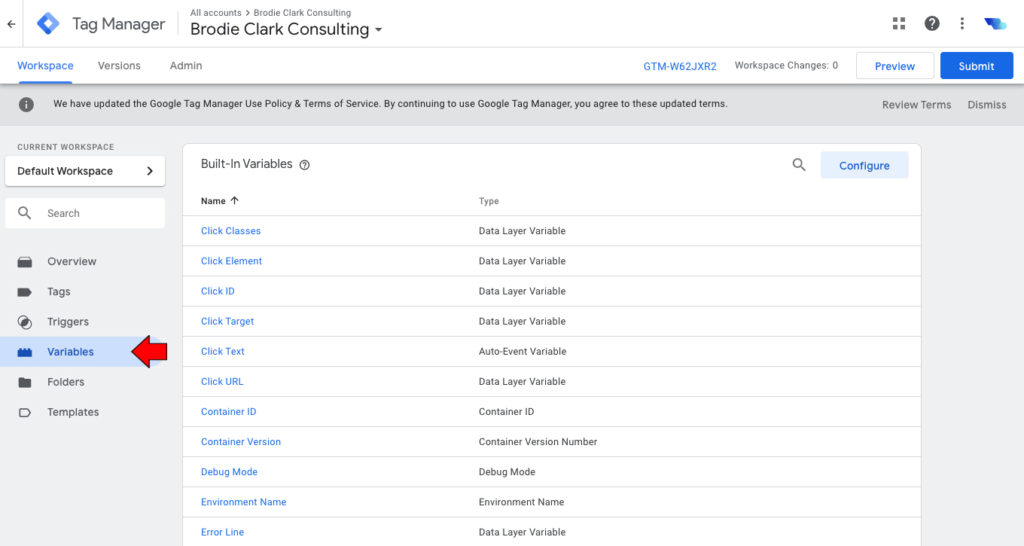
As a start, you’ll need to navigate to the ‘Variables’ tab within your container workspace. Here’s what this looks like:

Then scroll to the bottom and click ‘New’. Name it something like ‘Scroll to Fragment’ or anything that will help you identify it best. Then click on the ‘Variables Configuration’ section and select ‘Custom Javascript’.
Thankfully, Valentin Pletzer has gone ahead and made all of our lives easier by formatting the text so we can send to Google Analytics effectively. Here’s what the full script looks like which you can copy / paste:
function() {
  var entries = decodeURIComponent(performance.getEntries()[0].name.match("#:~:text=(.*)")[1]);
  var frag = entries.replace(/, /g,"*").replace(/,/g,"...").replace(/\*/g,", ");
  return frag;
}
Here’s what this should now look like:

Click ‘Save’ and proceed to Step 3.
Step 3: Connect your Google Analytics tag with the Google Tag Manager Custom Dimension
This was the part where I started to need some help. But the good news is that this was actually the easiest step of them all.
All you need to do it navigate to the ‘Tags’ tab within Google Tag Manager and select the ‘Google Analytics’ tag that you have in place.
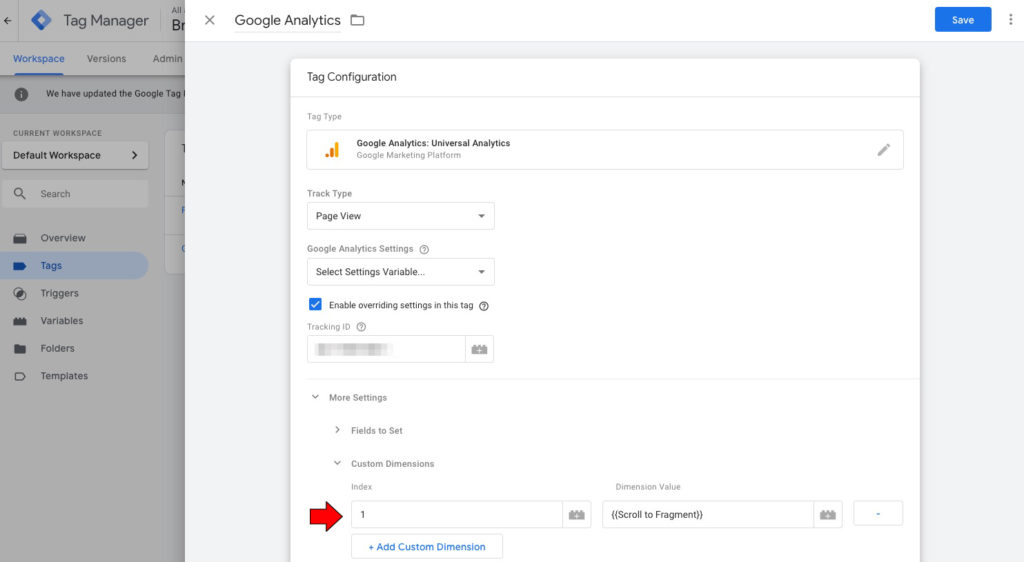
Once selected, you’ll then need to edit your existing GA tag directly. Within the tag, you should see a tab named ‘More settings’. Click that tab and then select ‘Custom Dimensions’ > ‘Add Custom Dimension’.
My understanding is that you can just label this ‘1’, if it’s just the first in series. Then click the battery icon next to ‘Dimension Value’, and you should be able to locate your Custom Javascript tag in there titled ‘Scroll to Fragment’.
Here’s what this should look like after completing the above steps:

You’ll then need to hit ‘Save’. Once saved, you can go ahead and use preview mode in GTM to check the implementation, then publish if all is functioning as expected.
Step 4: Create a new Custom Dimension in Google Analytics
In Google Analytics itself, we need to enabled our new Custom Dimension. To do this, you’ll need to select ‘Admin’ (bottom left of screen) > Custom Definitions (in the ‘Property’ section) > Custom Dimensions.
Select ‘New Custom Dimension’. Name it something relevant. I’ve used ‘ScrollToText Fragment Clicks’ in my setup. Keep the scope as ‘Hit’ and leave the ‘Active’ box ticked. Here’s what this should look like:

Click ‘Save’. You should now have the Custom Dimension setup within Google Analytics. We *should* now be all set to go.
Step 5: Access the report in Google Analytics and run a test
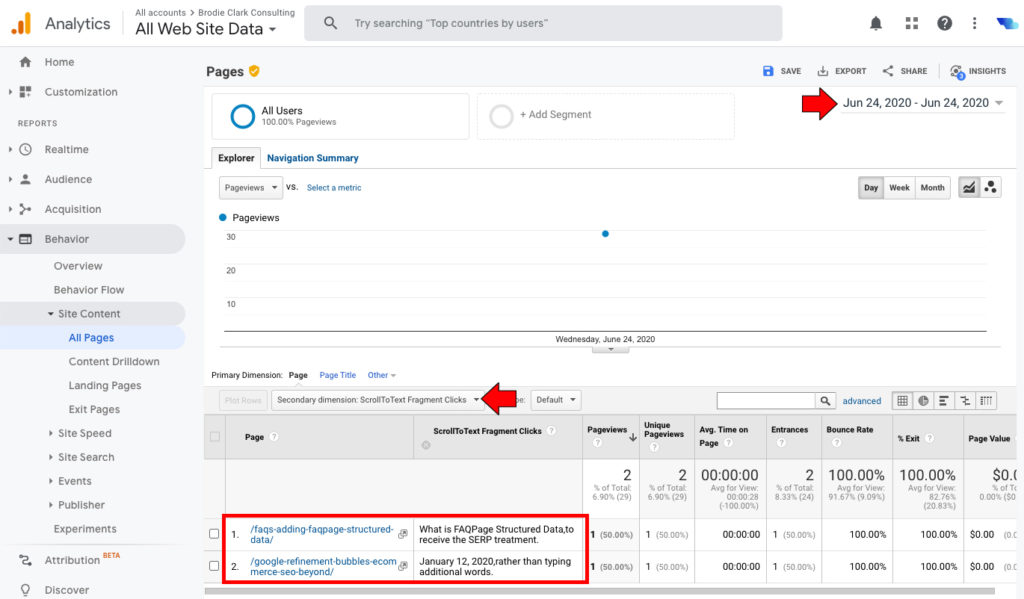
To access the report within Google Analytics you’ll need to first navigate to the ‘Behavior’ tab. Then go to ‘Site Content’ > ‘All Pages’. Note: I’m using ‘All Pages’ here because I just want to see the page views.
You’ll then need to select whatever the date is today. In my case, this article was published on June 24th. Then select the ‘Secondary dimension’ drop-down (don’t worry, I’ll show this in the screenshot), and search for your new Custom Dimension.
Here’s what this should look like:

h/t to Logan Ray of Beacon Technologies for sending through a revised version of the script originally created by Valentin. The output should now look something like this:
You can see that I’ve run a couple of tests using Featured Snippets for my own site above. This was for a couple of pages that I know sometimes show for Featured Snippets on Google (when using the Chrome browser, on desktop in this case).
As I mentioned earlier in this post, you don’t necessarily need to have a Featured Snippet showing. You could also use Google’s new Chrome extension or Dan Petrovic’s version to generate your own ScrollToText Fragment.
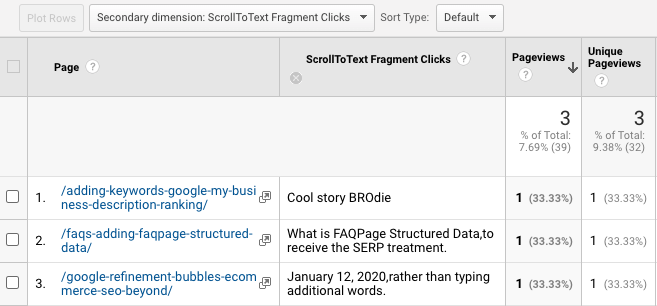
E.g. one that I created using Google’s tool was the following:
https://brodieclark.com/adding-keywords-google-my-business-description-ranking/#:~:text=Cool%20story%20BROdieAnd when I plug that into Chrome, it now changes the report above to the following:

Final thoughts
I’ll leave this post there, as remember what I said at the start, this little trick to tracking Featured Snippet clicks could be gone tomorrow. Making this post irrelevant.
But I sure learnt a lot by investigating this further and I’ll definitely be putting this into practice outside of just my own blog. Here’s a running list of ideas for using this approach (feel free to contribute your own):
- This allows you to see clicks on Featured Snippet URLs, which was impossible to do previously (filtering isn’t currently in Google Search Console – they tested this for a bit years ago – but not there anymore). So this allows you to generate a ‘x# of Featured Snippets’ and assign that to a site, via Chrome, when the highlighting is triggered… (majority of the time for paragraph snippets, at least).
- Because the data we’re collecting in Google Analytics shows both the start and end of the content being highlighted (note the ‘,’ is the divider among the two), you can essentially see the exact part of a page where a lot of users are being directly taken to.
- Knowing the highlight section, we can strategically place other elements close to this text based on our goals. If we want the user to continue reading, and other datasets (scroll depth, session duration etc.) is telling us they aren’t, figure out how to make the content more persuasive below the highlight point.
- Potentially add a CTA (ex: free downloadable resource link) directly below the highlighted section. If you were to add this to the very end of the post, and the highlight were to be triggered and the user leaves the page, they might never see that CTA.
Again, this article was very much a compilation of ideas, and I’ve tried my best to credit each individual for their contributions. With that said – please feel free to tag me on Twitter with any ideas or feedback you have on this process.